
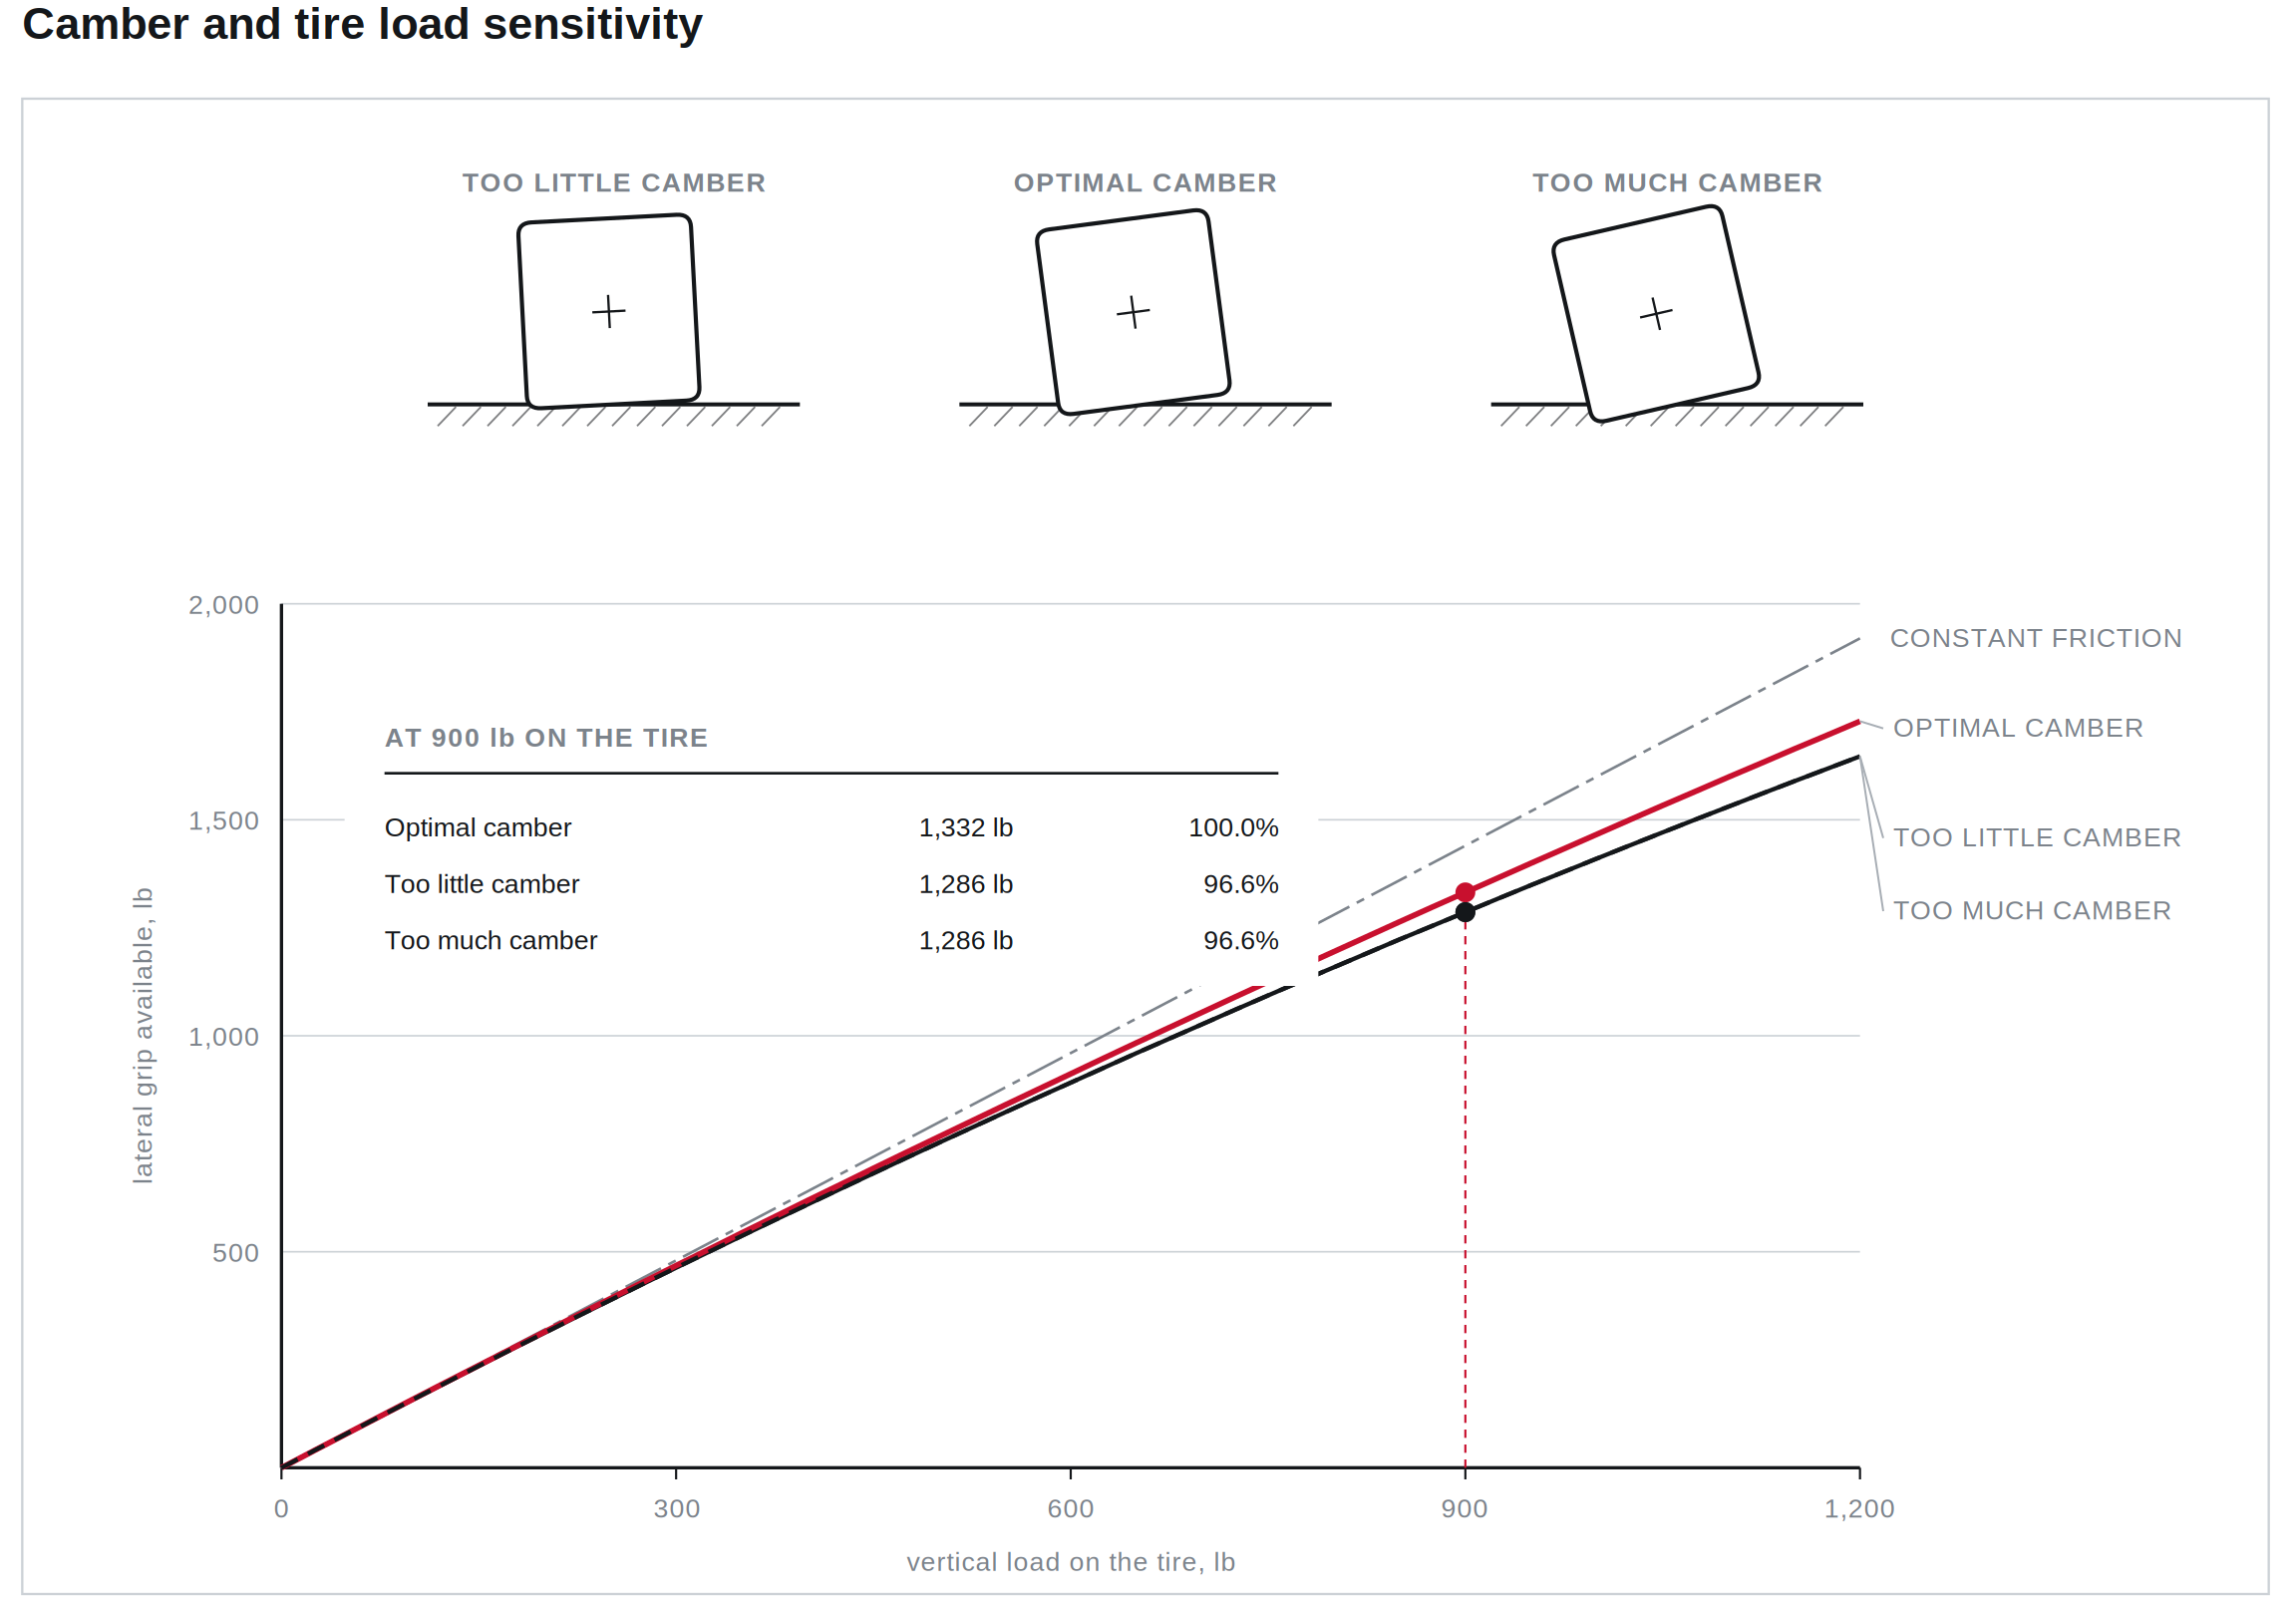
What Your Tire Actually Sees
The Suspension Setup Guide Fundamentals covers what negative camber does: it pre-tilts the wheel so the contact patch lands flat when the chassis rolls. That's the overview, and it's enough to make a sensible first adjustment.
This article is the depth behind it. Because the single most useful thing to understand about camber is that the static number you set in the shop is a starting condition, not a setting. It exists only with the car at rest, on a level surface, at a specific ride height, with a specific fuel load and a specific driver weight in the seat. The moment the car turns, everything about it changes.
Two cars can leave the shop at the same -3.0° front camber and put completely different camber angles into the road at the apex. Understanding why is what lets you arrive at the number your own car actually needs.
The effective camber equation
What the tire sees mid-corner is the sum of five things:
Effective camber = static camber + camber change from suspension travel + chassis roll + camber change from steering + compliance
Work through each one. The figures below are examples chosen to illustrate the relationship, not measured values for any particular car.
Static camber is what you set. Call it -3.0° on the front. You can directly adjust this.

Camber change from suspension travel is your suspension's camber curve doing its job. As the outside front compresses in a corner, a well-designed geometry adds negative camber relative to the chassis. Say the outside wheel goes 20mm into bump and the geometry adds 0.6° of negative camber. This is a function of the suspension design.

Chassis roll works directly against you. The whole car leans, and the wheel leans with it relative to the ground, which is the only reference that matters, because the ground is what the tire touches. A stiffly sprung track car might roll 2.0° in a hard corner. A street car on factory rates can roll 4° or more. That roll angle comes straight off your camber. This is tunable via spring and anti roll bar adjustments

Camber change from steering is the caster effect. Steer the wheel and the outside front rolls onto more negative camber, the inside onto more positive. This is adjustable via adjusting Caster

Compliance is everything flexing. Bushings deflect, control arms bend microscopically, subframes move, the chassis itself twists. Under a hard cornering load this almost always costs you negative camber. Call it 0.3°. You can't directly adjust this without changing suspension components, bushings, etc...

Add it up for a car set at -3.0°:
-3.0°   static
-0.6°   camber change from bump travel
+2.0°   chassis roll
-0.9°   steer-induced change from caster
+0.3°   compliance loss
-------
-2.2°   effective camber at the contact patch
You set -3.0. In the turn, the tire is working at -2.2. And that's before the tire itself deforms.
Now change one input. Stiffen the springs so the car rolls 1.4° instead of 2.0° and the tire sees -2.8° with the same alignment sheet. Add two degrees of caster and it sees roughly -2.5°. Fit stiffer bushings and you claw back most of that 0.3°.
This is why camber numbers don't transfer between cars. A camber spec is a statement about one specific chassis, at one roll stiffness, with one caster figure, on one tire. Lift the number off a car that isn't yours and you're inheriting all of those assumptions invisibly.
Camber curves: your chassis type has already decided most of this
The "camber change from suspension travel" term above is the one the designer controls, and it varies enormously by suspension type.
The governing concept is the instant center, the imaginary point the wheel is pivoting around at any moment, set by where the upper and lower control arm axes project and intersect. The distance from that point to the tire contact patch is the effective swing arm length. Short swing arm, aggressive camber curve, lots of camber gain per millimeter of travel. Long swing arm, flat curve, little gain.
Nothing is free. A short swing arm that generates strong camber gain also drags the contact patch sideways through its travel (scrub), moves the roll center around more, and makes the car more sensitive to ride height changes. Designers pick a compromise.

MacPherson strut front ends are geometrically constrained. The strut acts as an extremely long upper link, so the effective swing arm is long and camber gain in bump is limited. Struts also give up camber readily in roll. The practical consequence: strut cars need more static camber than double-wishbone cars to achieve the same mid-corner result.
You can see this in a real factory baseline. The 991 GT3 Cup runs a MacPherson strut front and a multi-link rear, and the Porsche Motorsport baseline is -4°50' front and -4°00' rear. The rear runs nearly a degree less static camber not because the rear needs less camber at the contact patch, but because the rear geometry generates more of it dynamically. The front has to buy statically what the rear earns through travel. Full numbers are in the 991 GT3 Cup Setup Guide.
Double wishbone geometry lets the designer set the curve deliberately by choosing unequal arm lengths and mounting angles. Race-oriented double-wishbone cars typically gain camber quickly in bump and hold it well in roll, which is why they run less static camber and are less punished by it.
The 992 GT3 Cup is the clearest illustration of the difference, because Porsche made the change on the same car. The 992 replaced the 991's MacPherson strut front end with a double wishbone front axle, so the front geometry now generates far more of its camber dynamically.

Multi-link rear designs sit between the two and generally behave well through travel.
The lowering trap
Here's where this bites people. Lowering a car moves every control arm to a different point in its arc, and on most road cars that point is worse, not better.
Two things happen. Static camber usually goes more negative, which looks like a win on the alignment sheet. But the roll center typically drops faster than the center of gravity does, which increases the roll moment. The car rolls more for the same cornering force. You gained static camber and then handed back more than you gained in roll, on a suspension now operating in a less favorable part of its curve.
This is the mechanism behind the line in the Fundamentals guide about lowering past the geometric design point hurting handling. It isn't an aesthetic objection. It's that below a certain point you need new geometry (camber plates, roll center adjusters, revised arms) to keep the curve working, and without them the car is measurably worse while looking measurably better.
Camber thrust: the forgotten force
A cambered tire rolling in a straight line generates lateral force toward the direction it's leaning. This is camber thrust, and it's a mechanism entirely separate from slip-angle grip.

The reason it matters is timing. Slip angle force takes distance to build. The tire has to be steered, loaded, and given some travel for the contact patch to distort and generate force. Camber thrust arrives essentially instantly.
That explains several things that otherwise look unrelated:
- Excess camber gives a car a pointy, eager initial turn-in that doesn't hold. Camber thrust delivers a crisp first bite; then the compromised contact patch fails to support the mid-corner load. The driver reports "it turns in great but won't hold the apex" and starts adjusting dampers. It's a camber problem.
- Left-to-right camber mismatch makes the car pull. Unequal camber thrust across an axle is a steady sideways force. This is why matching left and right within 0.1° per axle matters more than hitting the target number exactly. A symmetric car that's 0.2° off target is far better than an asymmetric car that averages perfect.
- Camber generates drag and heat in a straight line. You're paying for cornering camber on every straight.
The tire sets the ceiling
Ask the tire manufacturer for their number. Serious tire makers publish camber windows. Michelin's published window for the Cup 2 R tops out around -3.0°, and -4.0° is a hard ceiling on that tire under any circumstances. Track-focused GT4 RS setups routinely run -3.0° to -3.4° front, meaning the far end of the common community range is already beyond the tire maker's own guidance. That's a legitimate choice made knowingly, and it should be made knowingly. The pyrometer is what tells you whether you got away with it.
Reading it: the pyrometer method, properly
Tire temperature is the only direct evidence you have about whether your camber matches your tire.
Take readings within one lap of leaving the track, ideally with the car stopped and the driver still buckled in. Every additional second is a data-quality loss.
Three points per tire: inside, middle, outside, roughly an inch in from each shoulder. Same insertion depth, same dwell time, same operator every time.
Measure in the same order every session and record that order. The first tire you touch is hotter than the last simply because of elapsed time. Consistency of sequence is what makes the numbers comparable session to session.

Interpreting the spread
Across the three points, target a spread under 15°F to 20°F.
| Pattern | Diagnosis |
|---|---|
| Outside hot, middle mid, inside cool | Not enough negative camber |
| Inside hot, middle mid, outside cool | Too much negative camber |
| Middle hot, both edges cool | Tire pressure too high |
| Both edges hot, middle cool | Tire pressure too low |
| Even across all three | Camber matched to the tire |
Separating camber from everything that looks like camber
Camber and pressure both show up at the edges. A hot outside shoulder can mean insufficient camber or insufficient pressure, and if you read it as camber when it's pressure, you'll shim a car that didn't need shimming and make it worse everywhere else.
Resolve pressure first. Always. Look at the middle-versus-edges relationship before you look at the inside-versus-outside relationship. Pressure is a free, instant, reversible adjustment; camber is neither. Get the middle sitting correctly between the two edges, then read the edge asymmetry as camber.
Two more things worth ruling out:
Roll stiffness masquerading as camber. If the outside shoulder is hot only after long, sustained corners but reads fine after short ones, the problem is more likely that the car is rolling too much in sustained load than that static camber is short. That's a bar or spring change, not a camber change.
The driver is part of the instrument. Tire temperatures only report on what the driver actually asked of the tire. A front axle that never got properly loaded produces temperatures that say "not enough camber" and mean "not enough commitment." Read the temps alongside the lap times and the driver's own account of the session, not instead of them.
And be careful comparing left to right. Most road courses are directionally biased, so one side of the car works harder than the other by design. Compare left-front to right-front knowing that, or compare each corner only to itself across sessions.
Front-to-rear split as a balance tool
The Fundamentals guide notes that a car at -2.0° front and -1.5° rear will typically rotate more than the same car at -1.5° front and -2.0° rear. Camber split does something that springs and bars can't.
Springs and bars change how load is distributed between the axles. The total load transfer in a corner is fixed by CG height, track width, and cornering force; all a bar does is move which axle absorbs it. Camber changes how well each axle converts the load it already has into grip.
That makes camber split a genuinely different tool:
- It shifts balance without changing roll stiffness, so ride quality, bump compliance, and curb behavior stay where you put them.
- It shifts balance without moving load onto a tire that's already load-saturated, which matters because tire grip doesn't scale linearly with load. That's the whole premise of the Fundamentals guide.
The cost side: camber split is a slow adjustment. On most cars it involves shims, plates, or arm changes, and it usually requires a re-check of toe and corner weights afterward. It isn't free at the axle you take from, either. An axle with less camber corners worse, even as it brakes and accelerates better.
What camber costs
Every degree of negative camber that buys cornering grip spends something else. Budget it honestly.
Braking. Under straight-line braking you're standing the tire up on its inside edge with no roll to flatten it. At -3.5° you are braking on a meaningfully compromised contact patch, and the loss shows up worst exactly where the fast drivers live: trail braking into a corner, where the tire is being asked for longitudinal and lateral force at the same time.
Tire life. Inside-shoulder wear is the tax. On a dedicated track car with a pyrometer-verified setup, wear is roughly even and the tax is small. On a street-driven car at aggressive camber, the inside shoulder can be gone while the outside two-thirds still looks new.
Straight-line drag and heat. Camber thrust and the associated scrub are a continuous energy cost on every straight.
Mechanical limits. They end more camber ambitions than tire performance does:
- Tie rod thread engagement. Push camber far enough and the tie rod runs out of thread. The 991 Cup manual flags it above -4.5° front; on a stock GT4 the tie rods run out around -2.2° at zero toe. Checking thread engagement is not optional at high camber. This is a failure-under-load risk, not a setup inconvenience.
- Track width and clearance. Shim-based camber pushes the hub outward and forward. Fender liner contact and tire protrusion past the arch are common practical ceilings, particularly at the rear.
- Caster disturbance. On some shimmable lower control arms, camber and caster are adjusted by the same hardware and cannot be planned separately. Add camber and caster moves. Plan them together. Some aftermarket components are available to decouple the adjustments
How to actually arrive at a number
- Start from a documented baseline for your platform, not a general rule. Factory motorsport baselines and well-documented community consensus ranges both work; a number from a different chassis does not.
- Check the tire manufacturer's published camber window. If your target is outside it, that's a decision you're allowed to make, but make it deliberately.
- Set left and right within 0.1° per axle. Symmetry outranks the target value.
- Run the car and read the tires. Adjust pressures first until the middle sits correctly between the edges.
- Then adjust camber, in steps of roughly 0.25°, one axle at a time, one change at a time.
- Re-verify after anything that moves ride height: spring changes, corner balancing, aero loads. Camber is a function of ride height, so every ride height change is a camber change you didn't intend.
- Document the measurement conditions with the number. Fuel load, driver weight, tire pressures, ride height. A camber value recorded without its conditions is not repeatable, which means it isn't really data.
The measurement problem
Everything above assumes you can measure camber to a tolerance finer than the adjustments you're making.
Consider the tolerances actually in play. Matching left and right within 0.1° means resolving to 6 arc-minutes. Porsche's own factory specification for the 718 GT4 RS is tighter than that: front camber -1°30' with a ±3 arc-minutetolerance and a maximum left-to-right difference of 3 arc-minutes. Three arc-minutes is 0.05°.
Now consider what a wheel-referenced measurement carries with it. Any gauge that indexes off the wheel face or rim lip inherits:
- Lateral runout in the wheel itself
- Mounting variance: hub face cleanliness, lug torque sequence, centering
- Wheel damage, which on a track car is routine rather than exceptional
- Tire sidewall bulge, if the gauge references anything on the tire
Put a number on just the first one. A wheel with 0.5mm of lateral runout measured across a 20-inch rim represents an angular error of roughly 3.4 arc-minutes. That is a common, unremarkable amount of runout, and on its own it has consumed Porsche's entire factory tolerance window before the measurement has even begun. Stack mounting variance on top and the error can exceed the adjustment you're trying to make.
Whatever method you use, the test is the same one that applies to any instrument: remove the setup, re-install it, and measure again. If the second number doesn't match the first inside the tolerance you're chasing, the method can't support the adjustment. Roll the car, settle the suspension, and repeat. A camber figure you can't reproduce is a guess with a decimal point on it.
Closing thought
Camber has a reputation as the headline alignment adjustment, and it gets the most attention of any number on the sheet. The thing to carry out of this article is the principle. Static camber is one term of five. Roll stiffness, caster, compliance, and suspension geometry all move the number the tire actually sees, and most of them don't appear on the alignment sheet. We can adjust and/or improve a few aspects but the biggest one is adjusting static camber accurately and precisely to get dynamic camber where you want via tire temperature check.
Everything goes back to tire load sensitively, at the end of the day that's what touches the ground. Too much camber or too little camber hurt grip (and tire life!). The goal is to maximize grip available.

Set the number, then verify it at the contact patch.
This guide is published by CSM Performance. We design and manufacture precision alignment and setup tooling used by pro race teams, performance shops, and serious owners running these cars at the limit. Our Precision Hub Stands and Laser Alignment System are built for repeatable, measurement-quality alignments on Porsche, Corvette, BMW M, and similar performance platforms. If you're building out a setup capability at home, in a shop, or in the paddock, reach out: info@csmperformance.com
IMPORTANT DISCLAIMER
The information in this guide is provided for educational and reference purposes only. It describes general principles of suspension and chassis tuning that apply broadly to performance vehicles, but is not a substitute for vehicle-specific service information, factory specifications, or qualified professional inspection.
It is the owner's and installer's sole responsibility to verify that any adjustment applied to a specific vehicle is appropriate for that vehicle's hardware, intended use, tires, wheels, and operating environment. This includes confirming adequate component clearance, suitability of any aftermarket parts installed, and compliance with applicable laws and regulations for street-driven vehicles.
Operating a vehicle outside factory specifications may accelerate wear, alter handling characteristics in ways that require driver adaptation, affect vehicle stability under braking and at speed, and may void portions of the factory warranty. Any modifications described should be performed using properly torqued, properly rated, and correctly installed components.
CSM Performance, the authors, and contributors to this guide make no warranties regarding the suitability of these principles or specifications for any particular vehicle or use case, and assume no liability for any damage, injury, loss, or warranty implications arising from their application. Use at your own risk.


Share:
Camber Gauges: Measuring the Angle vs. Trusting the Number
Porsche 718 GT4RS Setup Guide