A practical alignment, corner-balance, and chassis tuning reference for the 991-generation Porsche 911 GT3 Cup (2014-2020), covering both 991.1 (MY2014-2016) and 991.2 (MY2017-2019) variants. For teams, drivers, and shops running these cars in club racing, regional Cup series, customer endurance programs, and the substantial 991 Cup ecosystem that continues to compete worldwide. Baseline values throughout this guide reflect the Porsche Motorsport 911 GT3 Cup (991 II) MY 2019 Technical Manual, V 03/13/2019 edition.
What this guide is, and what it isn't
The 991 GT3 Cup is one of the most successful customer race cars ever built. Across two iterations (991.1 from 2014 and the updated 991.2 from 2017), Porsche delivered a chassis that launched countless careers, supported entire series, and remains genuinely competitive in club and amateur racing well beyond its factory production years. The hardware envelope is well-documented, the parts supply is mature, and the chassis is honest and progressive in a way that rewards proper setup.
This guide is built around the official Porsche Motorsport performance baseline as documented in the factory technical manuals, notes on how that baseline gets adjusted for circuit type, weather, and tire condition, and a discussion of the procedures and tools that separate a well-set-up 991 Cup car from a mediocre one.
This is not a substitute for the Porsche Motorsport Technical Manual itself or sanctioned body requirements. Those documents are the canonical reference for torque specs, factory baseline values, and series-specific homologation requirements. This guide assumes you have them and is meant to complement them with practical context.
What's in front of you: the 991 Cup hardware overview
The 991 Cup brought significant changes from its 997 predecessor. Key features relevant to setup:
- MacPherson strut front axle. Aluminum transverse control arms with Uniball joints, attached to the body via a Uniball joint in the strut bearing. The two-piece forged aluminum lower control arm allows continuous camber adjustment via spacers in the inner mount. Fine adjustment via slots in the strut dome.
- Multi-link rear axle. Longitudinal and transverse control arms attached separately to the wheel mount. Two-piece forged aluminum rear lower arm for camber adjustment via spacers. Length-adjustable track rod for toe.
- Uniball joints throughout. All control arms run high-performance joint bearings to minimize play and reduce unwanted elastokinematic effects.
- Adjustable double-blade anti-roll bars, both axles. Seven positions per side, with each step changing blade angle by 15°. Maximum stiffness when blade is parallel to the anti-roll bar link; minimum stiffness at 90°.
- Two-tube gas pressure shock absorbers. Concentric main and helper springs. Integrated bump stop for stroke limitation. Non-adjustable.
- Coil springs: Front main 240 N/mm with 75 N/mm helper; rear main 260 N/mm with 80 N/mm helper.
How the 991.2 differs from the 991.1
For setup purposes, the 991.1 and 991.2 are essentially the same chassis. The factory performance setup baseline is identical between the two manuals.
- Engine. 991.2 introduced the 4.0L (3,996 cc) flat-six replacing the 3.8L (3,797 cc) of the 991.1. Max engine speed remains 8,500 rpm but the overhaul interval extended to 100 hours (from 50 hours on the 991.1).
- Bodywork. 991.2 received updated body work including a new front bumper and redesigned LED tail lights.
- Default rear wing position. The 2016 manual specifies wing position P6, the 2019 manual specifies P9, both within the same nine-position adjustable range. The wing itself is unchanged.
Reading the numbers: minutes, mm, decimal degrees
The 991 Cup factory baseline is documented in arc-minutes per side (toe) and degrees-and-minutes (camber). At the track, string box or toe plate measurements read directly in millimeters. All three units appear in the tables below, with millimeters leading where appropriate.
- 1mm of toe per wheel at 18" rim ~ 7.5' (0.125°)
- 1' per wheel at 18" rim ~ 0.13mm
- 1° per wheel at 18" rim ~ 8mm of toe
The 991 Cup runs 18" rims at both axles (10.5x18 front, 12x18 rear), so the 18" reference applies throughout this guide.
One important convention to note: Porsche Motorsport documents toe per side, not as total per axle. A spec of "+17' per side rear toe" means each rear wheel toes in 17 minutes individually, for a total axle toe-in of 34 minutes. Always verify which convention your alignment is following.
The Porsche Motorsport performance baseline
The factory standard setup. This is the alignment that comes off the truck and the alignment to return to when a setup goes wrong. The baseline assumes 50% fuel load (~50 liters in the 100L cell), driver compensation weight on the seat, and the Michelin slicks at the specified pressures.
|
Parameter |
Front axle |
Rear axle |
|
Camber per wheel |
-4° 50' -4.83° |
-4° 00' -4.00° |
|
Toe per side |
0.65mm out -5' / -0.083° |
2.2mm in +17' / +0.283° |
|
Ride height slicks at baseline pressure |
78 mm |
100 mm |
|
Anti-roll bar position left/right |
3 |
6 |
|
Main spring rate / dia / length (mm) |
240 N/mm 240-60-120 |
260 N/mm 260-60-130 |
|
Helper spring rate / dia / length (mm) |
75 N/mm 75/60-43 |
80 N/mm 80/60-60 |
|
Tire pressure slicks |
1.85 bar (26.8 psi) |
1.9 bar (27.6 psi) |
|
Brake master cylinder |
17.8 mm |
17.8 mm |
|
Balance beam display |
50/55 |
|
|
Rear wing position 9 positions available |
P6 (991.1) / P9 (991.2) |
|
|
Fuel for setup |
50 liters (50% of race quantity) |
|
The 991 baseline runs more rear toe-in than the 992 that replaced it. The MacPherson strut front means dynamic camber gain is more limited than a double-wishbone car, so the static -4° 50' front camber is high to keep the contact patch loaded under cornering. The -5' front toe-out per side gives the 991 strong initial turn-in, balanced by the +17' rear toe-in that adds rear stability under throttle and braking.
Reference dimensions for setup work
Geometry references. Wheelbase is 2,463mm. Front overhang is 1,043mm and rear overhang is 1,045mm, so the car is nearly symmetric end-to-end despite the rear-engine layout. Vehicle width is 1,848mm at the front and 1,862mm at the rear, the modest 14mm rear-bias track contributing to the chassis's planted feel under throttle. On Hub Stands the front Track Width tends to be wider due to the Camber differential
Wheel and tire envelope. Both axles run 18" rims: 10.5" wide at the front, 12" wide at the rear, both forged aluminum. Spec tires are Michelin slicks in 27/65-18 (S8H) at the front and 31/71-18 (S8G) at the rear. The 18" rim diameter is what makes the toe-conversion math work out the way it does in the unit-conversion notes above.
Aero reference. The wing is adjustable across nine positions; baseline is P6 in the 991.1 manual, P9 in the 991.2 manual.
Adjusting from baseline: how to think about it
Most setup work on a 991 Cup car is small deviations from the Porsche Motorsport baseline, made in response to specific track characteristics, weather, or tire condition. Here are the main levers and what they do.
Front camber
The baseline -4° 50' is at the upper end of what the MacPherson front geometry can deliver effectively. Camber adjustment uses two methods: rough adjustment via spacers between the lower control arm and the front cross-member, and fine adjustment via slots in the strut dome that allow the strut top to move inward or outward.
For high-camber settings beyond 4.5° watch tie rod thread engagement.
For most circuits, stay within ±0.3° of the baseline. Pushing toward -5°' for long, fast corners where the outside front tire spends extended time loaded. Pull back toward -4° 30' on tight technical circuits where straight-line braking dominates and you want more contact patch under braking. Watch the inner edge of the front tire after each session: if it's hot, blistered, or wearing visibly faster than the middle, you have too much camber.
Rear camber
The baseline -4° 00' is conservative compared to the front, reflecting the multi-link rear's better dynamic camber gain through travel. Rear camber adjusts via spacers in the upper transverse control arm.
Stay within ±0.3° of the baseline. The 991 Cup is rear-engine and traction-limited out of slow corners; reducing rear camber too far hurts you under acceleration. Pushing rear camber more aggressive helps mid-corner grip but at the cost of straight-line traction.
Front toe
The baseline -5' per side (0.65mm out per side, 1.3mm out total) is moderate toe-out for sharp turn-in. For tight circuits where turn-in needs to be even sharper, consider increasing to -7' per side (0.9mm out per side). For high-speed circuits where braking stability matters more than initial bite, reduce to -3' per side.
Front toe is the single fastest-feeling adjustment on the car; small changes (0.2-0.3mm per side) are noticeable. Make adjustments in small increments and test before chasing further.
Rear toe
The baseline +17' per side (2.2mm in per side, 4.4mm in total) is significantly more rear toe-in than the 992 Cup that replaced it. This reflects the 991's narrower rear track and the platform's preference for rear stability over rotation in this generation.
Most adjustments stay within +13' to +20' per side. Adding rear toe-in to +20' per side (2.6mm in) increases rear stability for high-speed circuits, or tracks with long straights and big braking zones. Reducing toe-in toward +13' per side (1.7mm in) increases rotation on tight technical circuits.
Anti-roll bars
Both bars are double-blade, adjustable, with seven positions per side and 15° between steps. Maximum stiffness: blade parallel to drop link. Minimum stiffness: blade at 90° to drop link. Asymmetric adjustment (different blade positions left versus right) produces different cornering behavior in left versus right turns, so both blades should be set to the same position unless deliberately tuning for a banked or one-direction track.
Baseline is FA position 3, RA position 6. The 991 Cup's natural balance is mildly understeering at this baseline; moving the rear bar one position softer (RA 5) is a common first adjustment for adding rotation. Stiffening the front bar (FA 4 or 5) adds understeer; softening the front (FA 2) adds rotation by reducing front roll resistance.
Ride height and rake
Baseline 78mm front, 100mm rear with slicks at baseline pressure, measured at the front cross-member mounting bolt and at a milled surface on the rear side part. Front and rear axles must be compressed and rebounded several times before measuring; the dampers settle and ride height drops.
The 22mm baseline rake balances aero efficiency (wants more rake) and front mechanical grip / braking stability (wants less rake). Reducing rake (raising the front 2-3mm or lowering the rear) shifts aero balance forward and helps the car turn in at speed. Increasing rake shifts balance rearward and increases stability at the cost of front-end response.
Setup adjustments by circuit type
Starting deltas from the Porsche Motorsport baseline. Refine these over multiple sessions; the values below are sane first moves from a clean baseline.
|
Circuit Type |
Examples |
Adjustments from baseline |
|
High-speed flowing |
Road America, Watkins Glen, Spa |
Front camber to -5° 00'. Rear camber to -4° 10'. Reduce front toe-out to -3' per side. Increase rear toe-in to +20' per side. ARB rear to position 7 (stiffer). Increase rake by 2-3mm. |
|
Tight technical |
Lime Rock, Sonoma, Mid-Ohio |
Front camber to -4° 30'. Rear camber stay at baseline. Increase front toe-out to -7' per side. Reduce rear toe-in to +13' per side. ARB rear to position 5 (softer). Reduce rake. |
|
Mixed flowing/technical |
VIR, COTA, Sebring |
Stay close to baseline. Possibly increase front toe-out to -6' per side for sharper turn-in. |
|
Bumpy / curb-heavy |
Sebring, Long Beach, street circuits |
Increase front ride height by 3-4mm. Soften both ARBs by one position. Reduce front camber by 0.2-0.3° (less reliance on perfect contact patch over bumps). |
|
Wet conditions |
Any circuit, rain (Michelin rain tires) |
Reduce front camber to -4° 00'. Reduce rear camber to -3° 30'. Run -3' front toe per side. Increase rear toe-in to +20' per side. Soften both ARBs by 1-2 positions. |
Aligning a 991 Cup the right way
A correct alignment is fundamentally a question of doing things in the right order, with the chassis in the right state when each measurement is taken. Most of the differences between a fast, repeatable shop and a struggling one come down to discipline at this stage, not to clever tricks at the end.
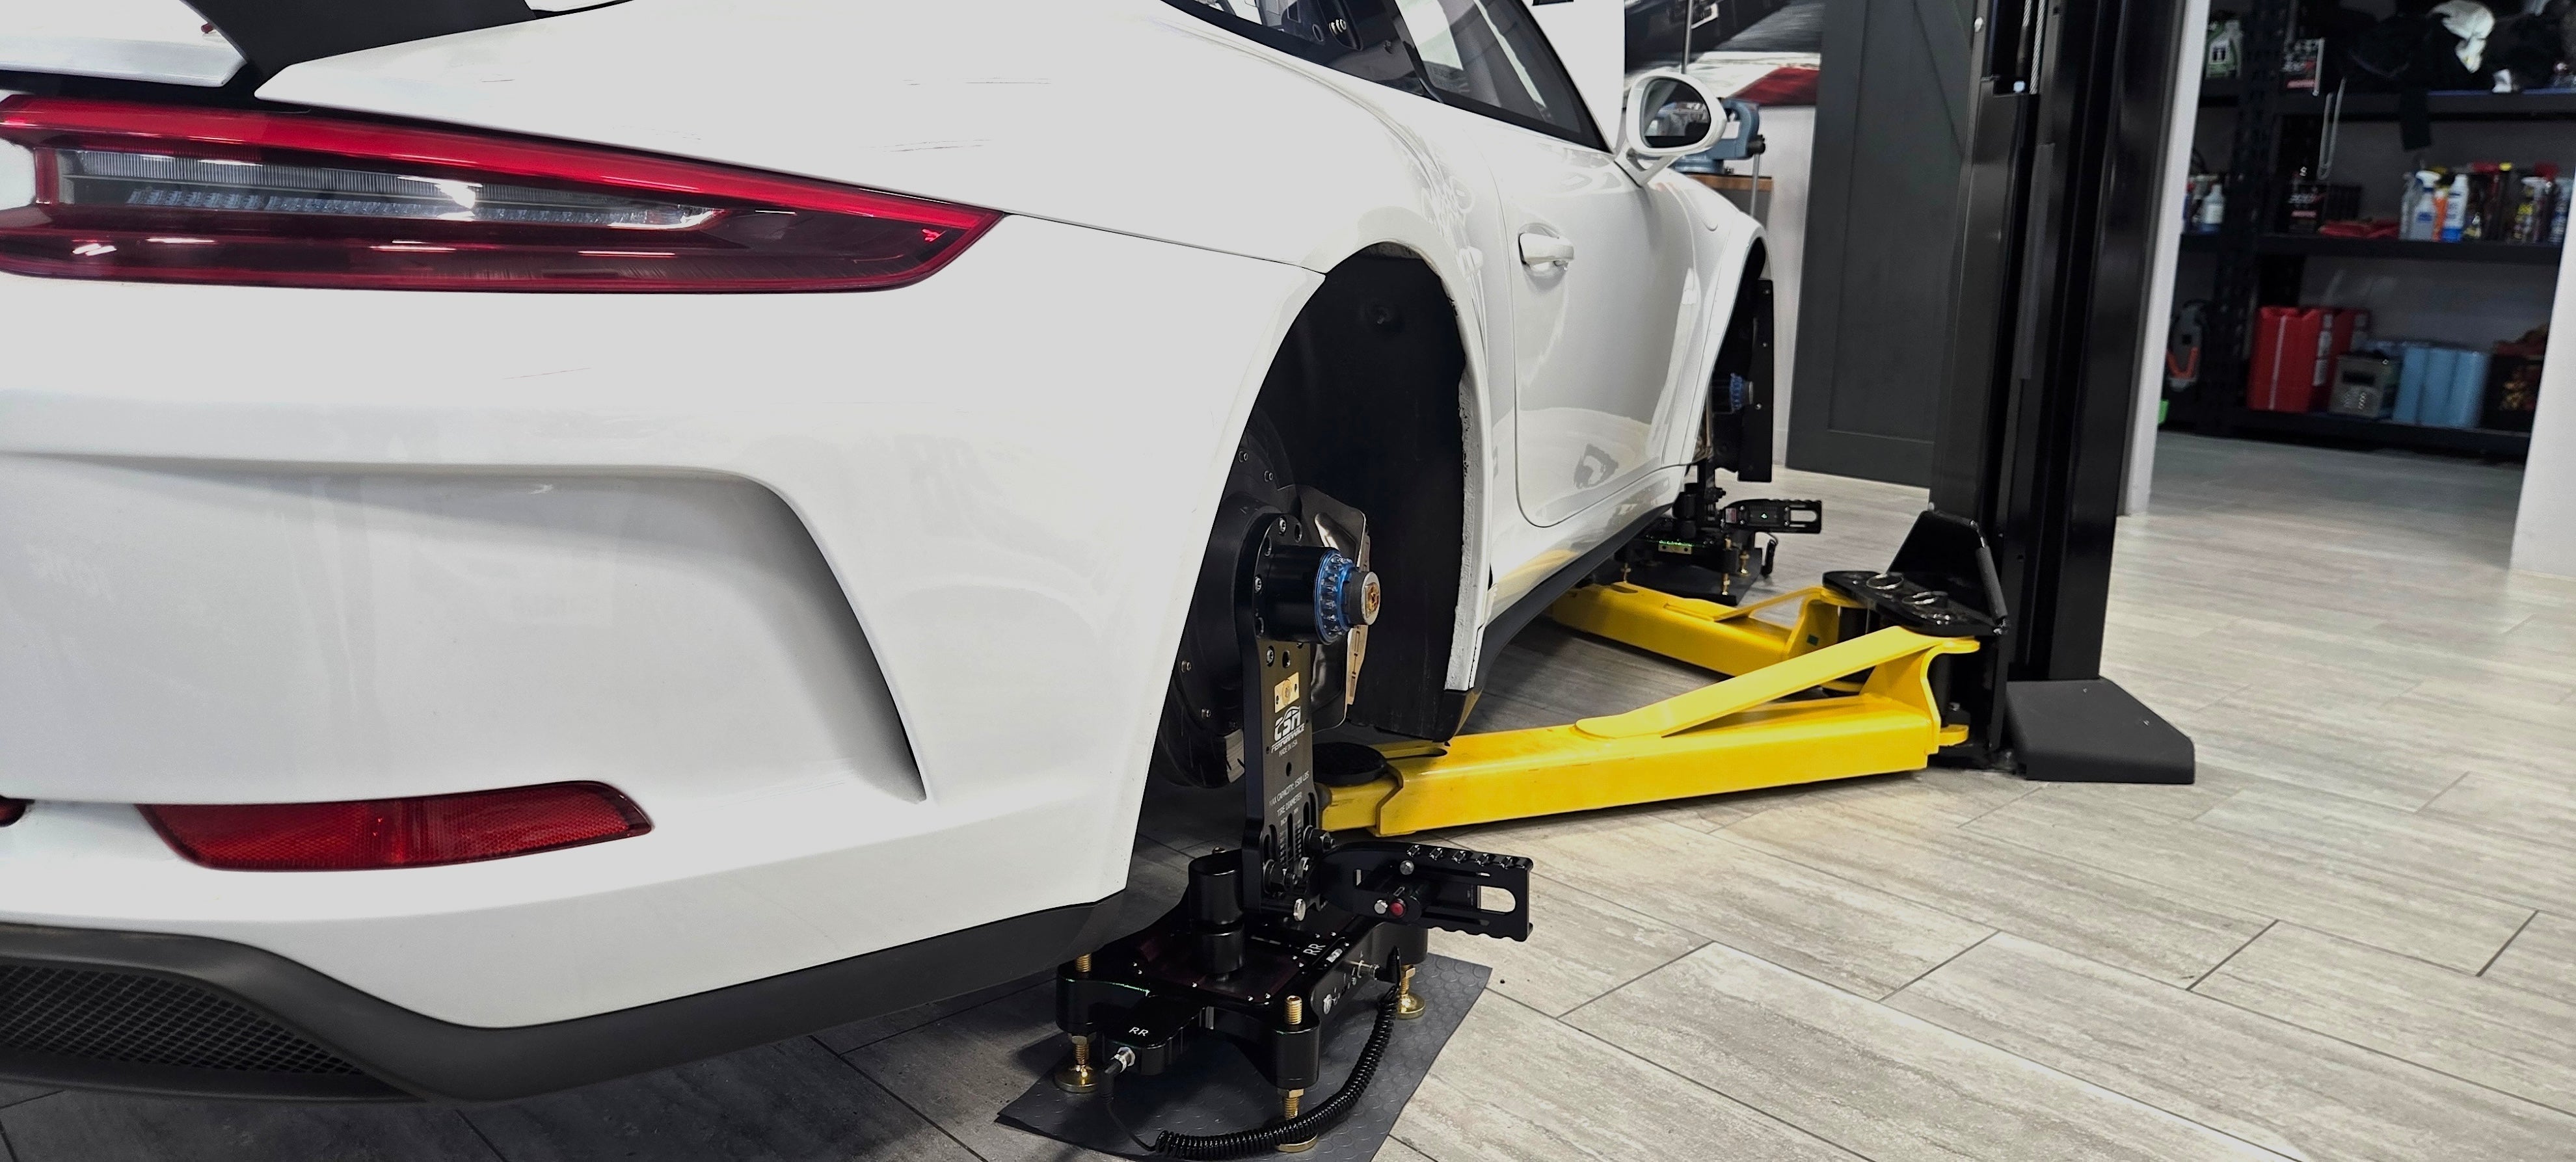
Start by getting the car into its on-track configuration. That means driver compensation weight in the seat, the fuel cell at roughly half a race load (around 50 liters in the 100L cell), and tires inflated to hot pressure all around. Depending on your setup equipment you may need to bounce both axles and roll the car back and forth. Hub Stands remove the need to roll the car back and forth. Dampers settle, springs find their seats, and ride height drops several millimeters during this process. Skip the settling and your numbers won't repeat.
With the car prepared, the first physical step is to disconnect the anti-roll bars at both axles. This is non-negotiable. Any preload in the bars corrupts wheel position readings, and worse, the corruption is asymmetric in ways that make the car drift toward a setup you didn't intend. The bars come off, then the chassis is allowed to settle again.
Now set the ride heights to the baseline or desired values: 78mm front, 100mm rear, measured at the documented points (the front cross-member mounting bolt at the front, a milled reference surface on the rear side part). These are starting values; you'll come back and refine them once camber and toe are dialed.
Work the rear axle before the front, and within each axle work camber before toe. The reason: setting camber moves toe (the geometry of the spacer-shimmed lower arm guarantees this), so any toe value you set before finalizing camber gets thrown away when camber moves. Match left to right within 0.1° on camber and within half a minute on toe. After the rear is done, do the front the same way.
With camber and toe locked in, return to ride height and now adjust it together with corner weights. Wheel loads on this chassis are tuned by changing ride height at individual corners, not by adding ballast. Aim for the lowest left-to-right deviation per axle that you can achieve. Cross weight should fall close to 50% on a symmetric chassis; if it doesn't, something is bent or worn. We recommend sacrificing some cross weight differential to maintain 40lbs (18 Kg) across the front axle. Left Front and Right Front being within 40lbs (18 Kg) of each other
Finally, reattach the anti-roll bars, and reattach them with absolutely no tension. The drop links should connect to the bar without any preload at all; if you have to pull or push on anything to align the holes, the bar is going on with stored tension that will throw off everything you just set. The factory documentation is unambiguous on this point and there's no shortcut around it. While you're there, verify that each ARB drop link has at least 12mm of clearance to its adjacent control arm at full droop. Insufficient clearance creates drop link interference at full extension, which produces unpredictable behavior over curbs and big compressions.
Tire pressure
Cup teams adjust tire pressure between every session. The factory baseline is 1.85 bar (26.8 psi) front, 1.9 bar (27.6 psi) rear on Michelin S8H/S8G slicks, but actual on-track pressures depend on track temperature, surface, stint length, and current Michelin specification.
What matters from a setup perspective:
- Pressures specified by Michelin for the S8H/S8G are hot. Cold pressures are set lower; the tire heats up to the target during the session. Most teams record cold pressure, take a hot pressure reading immediately after the car enters the pit lane, and adjust the next cold setting based on the delta.
- A 0.3-0.4 bar (4-6 psi) rise from cold to hot is normal. Larger rises usually indicate the tire is being overworked.
- Pyrometer readings across the tire (inside, middle, outside) within one lap of coming off track tell you whether pressure is right. Middle hotter than edges means pressure too high. Edges hotter than middle means pressure too low.
Always defer to Michelin's current spec sheet for the S8H and S8G for absolute pressure values. They publish track-specific recommendations and update them as the tire spec evolves.
Common mistakes
Aligning a car that hasn't been corner-balanced. The Porsche Motorsport procedure specifies setting wheel loads as part of the alignment sequence; skipping this and aligning separately will end up redoing the alignment.
Aligning with the anti-roll bars attached. Detach the ARBs first and reattach last, with no preload. Cars aligned with ARB tension show drift in the readings as soon as you take it back to the track.
Running aggressive camber without checking tie rod engagement. Above 4.5° front camber keep sufficient thread engagement on the tie rod. Skip this step at high camber and you risk a tie rod failure under cornering load.
Stacking too many spacers. Use as few spacers as possible to reach the desired length, since stacked spacers are subject to clamping force loss from settling under load. Thinner shims belong on the inside of the wishbone (fixed bearing side) to avoid clamping the tapered area of the stud.
Ignoring tire age and heat cycles. Slicks degrade significantly across heat cycles. A setup that worked on fresh tires will feel completely different on 8-cycle tires, and the right answer is often to change tires, not change setup. Track tire age and don't chase a setup change that's actually a tire condition issue.
Not documenting. Every setup change, every condition, every result. Without records, you can't repeat what worked or troubleshoot what didn't.
Priority order when time is short
At the track between sessions, you don't always get to do a full alignment from scratch. When time is constrained, the question becomes: what gets touched first, what gets verified, and what gets left alone?
The first priority is always mechanical condition. Joint heads, wheel bearings, ball joints, track rod ends, ARB drop links, damper mounts, drive shaft cages. If something is worn or marginal, no setup change in the world fixes it; you're just measuring a moving target. Whatever you replace, replace before any measurement begins.
The second priority is tire pressures, set cold and equal across each axle. Driver weight in the seat. Fuel cell at the right level. These are the boundary conditions that make every other measurement meaningful.
From there, the priority order tracks the alignment procedure described above: anti-roll bars off, ride heights set, rear before front, camber before toe within each axle, then ride height refinement and corner weights, then anti-roll bars back on with no tension. Match left to right tightly within each axle (0.1° camber, half a minute toe). Verify drop link clearance after the bars go back on.
The last step is documentation. Every value, every condition, the date, the track. Without records, you can't repeat what worked or troubleshoot what didn’t.
Quick-reference baseline summary
|
Parameter |
Front |
Rear |
|
Camber (per wheel) |
-4° 50' -4.83° |
-4° 00' -4.00° |
|
Toe (per side) |
0.65mm out -5' / -0.083° |
2.2mm in +17' / +0.283° |
|
Ride height (slicks at baseline) |
78 mm |
100 mm |
|
ARB position |
3 |
6 |
|
Main spring rate |
240 N/mm |
260 N/mm |
|
Helper spring rate |
75 N/mm |
80 N/mm |
|
Tire pressure (running) |
1.85 bar (26.8 psi) |
1.9 bar (27.6 psi) |
|
Master cylinder |
17.8 mm |
17.8 mm |
|
Balance beam display |
50/55 |
|
|
Rear wing |
P6 (991.1) / P9 (991.2) |
|
|
Driver ballast / fuel |
Driver compensation weight in seat / 50L |
|
Closing thought
The 991 GT3 Cup is a race car with a deep parts supply and a setup window that rewards measurement and discipline. The factory baseline is genuinely good, and many drivers spend an entire season making small adjustments around it. The fastest teams in club and pro 991 Cup racing aren't the ones with the most exotic setups; they're the ones who measure precisely, document obsessively, identify what each adjustment does on their car at their tracks, and change one thing at a time.
This guide is published by CSM Performance. We design and manufacture precision alignment and setup tooling used by pro race teams, performance shops, and serious owners running Porsche Cup cars and other high-performance platforms at the limit. Our Precision Hub Stands and Laser Alignment System are built for repeatable, measurement-quality alignments in the paddock and at the shop. If you're building out a setup capability for your team or program, reach out: info@csmperformance.com.
IMPORTANT DISCLAIMER
The setup specifications in this guide are intended for purpose-built, dedicated competition vehicles operated on closed circuits under proper safety conditions. Baseline values cited reference the Porsche Motorsport 911 GT3 Cup (991 II) MY 2019 Technical Manual, V 03/13/2019 edition, and the 911 GT3 Cup (991) MY 2016 Technical Manual, V 08.05.2020 edition. They are provided for reference and informational purposes only and do not replace the official Porsche Motorsport documentation, team manual, or series-specific homologation rules.
It is the team's, owner's, and crew chief's sole responsibility to verify that any setup applied to a specific vehicle is appropriate for that vehicle's hardware condition, tire specification, race series rules, and intended circuit. This includes confirming adequate component clearance, the integrity and condition of all spherical bearings and adjustable links, sufficient tie rod thread engagement at high camber settings, proper torque on all fasteners, and compliance with applicable series technical regulations.
Operating a race car at the limit involves inherent risk. Setup changes can alter handling characteristics in significant ways and require driver familiarization. Always validate setup changes incrementally in safe, controlled environments before pushing for time. Porsche Motorsport updates technical documentation periodically; verify current values against your team's most recent edition.
CSM Performance, the authors, and contributors to this guide make no warranties regarding the suitability of these specifications for any particular vehicle, team, or use case, and assume no liability for any damage, injury, loss, race result, or regulatory implications arising from their application. Use at your own risk.
Trademark notice: CSM Performance is not affiliated with, endorsed by, or sponsored by Dr. Ing. h.c. F. Porsche AG. Porsche, 911, GT3, and GT3 Cup are trademarks of Dr. Ing. h.c. F. Porsche AG, used here for identification and editorial reference only. Michelin, Performance Friction, AP Racing, and Bosch are trademarks of their respective owners.


Share:
Why Hub Stands?
Suspension Setup Fundamentals